This post may contain affiliate links, please see our
privacy
policy for details
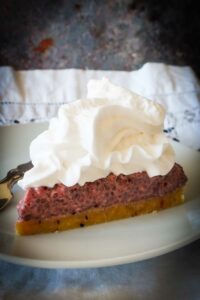
This No-Bake Berry Chia Cake proves that healthy gluten-free desserts don’t have to be bland. Imagine a sweet, fruity filling packed with chia seeds, set on a buttery almond flour crust. It’s easy to make, gluten-free, grain-free, plant based, and requires no baking. It’s perfect for anyone who’s into guilt-free sweet indulgence. Whether you’re craving something sweet and healthy, or a dessert for your guests, this chilled dessert has it all. What’s not to love?

Wholesome No-Bake Berry Chia Dessert
This no-bake chilled dessert is healthy, refreshing, and pretty much a breeze to make. The almond flour crust is full of healthy fats and protein, while the berry chia filling gives you a dose of fiber, antioxidants, and omega-3s. It’s the dessert equivalent of a superfood smoothie but in cake form.
What Are Chia Seeds?
Chia seeds are the tiny superheroes of the seed world. Packed with nutrients, these tiny seeds are a powerhouse of omega-3 fatty acids, fiber, protein, antioxidants, and various vitamins and minerals.
And if you’re wondering, “Are all chia seeds the same?” well, not exactly. There are black and white chia seeds, but both are equally nutritious. They might look a little different, but nutritionally, they’re twins. They’re the MVP of healthy eating, especially when adding texture and thickening your favorite recipes—like this dessert filling!

3 Easy Steps to No-Bake Gluten-Free Berry Chia Cake
(recipe details in recipe card at the bottom)
Prepare the Crust: Mix almond flour, coconut flour, and salt. Add maple syrup, melted butter (or coconut oil), and vanilla. Press into an 7-inch pan and refrigerate.

Make the Filling: Blend berries, coconut milk, maple syrup, vanilla, lemon juice, and salt until smooth. Stir in chia seeds and refrigerate for 30 – 45 minutes, allowing the mixture to thicken.
Assemble the Tart: Stir the mixture, and pour into the chilled crust. Smooth the top and refrigerate overnight to allow it to fully set.
Tips for Making the Perfect No-Bake Berry Chia Cake
- Add Nuts or Seeds to the Crust: Chopped pecans, walnuts, or cashews can add a bit of crunch and healthy fats to the crust. Pumpkin seeds or sunflower seeds can also be a great addition to a nut-free version.
- Customize Your Sweetener: If you want to cut back on sugar but still enjoy a sweet treat, swap out the maple syrup for stevia or monk fruit sweetener. Or, get fancy with date syrup or coconut nectar.
- Add Protein: Want to make this dessert even more filling? Add a scoop of plant-based protein powder to the filling. Suddenly, it’s not just a dessert—it’s a meal. (Okay, that might be a stretch, but you get the idea.)
- Flavor Experiment: Feeling adventurous? Add a dash of cinnamon or nutmeg to the filling for a cozy-inspired twist. Or swap out the berries for something tropical, like mango or pineapple. Who says you have to follow the rules?
- Make it Ahead of Time: The beauty of a no-bake cake? You can make it the day or two before and just let it chill in the fridge. That way, you can impress your guests with your “effortless” dessert, while you secretly take zero time to bake anything. (Haha)
Serving and Storing Ideas
Serving Suggestions: Serve it with fresh berries on top, or take it to the next level with a dollop of whipped coconut cream. If you’re feeling extra, drizzle a little melted dark chocolate over the top…so good! And remember, you can serve it as a fancy brunch addition too!
Storage: Store it in the fridge to preserve its freshness. It should last about 4 days, but let’s be real—you’ll probably eat it all long before that.
An easy way to slice no-bake chia cake!
- Chill Well: Make sure the cake is fully set and chilled, ideally overnight. The colder it is, the firmer the filling, making it easier to slice.
- Warm the Knife: Run a sharp knife under hot water for a few seconds, then dry it off before cutting. The warmth helps the knife glide through the chia filling without getting stuck.
- Springform Pan: After removing the sides of the springform pan, you can lift the cake off with the parchment paper and place it on a cutting board to slice. If the cake is delicate, you can slice it while it’s still on the parchment paper and then carefully transfer the slices to plates.
- Cut with a Gentle Motion: Use a gentle sawing motion to avoid squishing the tart.
Here are some of our favorite gluten-free recipes using chia seeds
Final Thoughts: No-Bake Gluten-Free Berry Chia Cake
This naturally gluten-free Berry Chia Cake is as delicious as it is nutritious—and the best part? No oven required! It’s the perfect treat to serve at your next dinner party or enjoy as a sweet snack throughout the week. With its simple prep and health benefits, it’s a total win-win! Go ahead, slice yourself a piece of chilled berry goodness—knowing you’re treating your body to wholesome, feel-good ingredients.


Leave a Reply
You must be logged in to post a comment.