This post may contain affiliate links, please see our privacy
policy for details
These gluten-free pumpkin cranberry scones are tender, buttery, filled with zesty cranberries, and generously drizzled with a delicious silky nutmeg glaze. They are my favorite scones for fall, especially during pumpkin season!
The Role of Pumpkin in Gluten-Free Scones
Pumpkin puree offers several benefits:
Moisture: Pumpkin puree adds moisture to the scone dough, helping to create a tender and soft texture. This is particularly important for gluten-free scones, which can sometimes be drier than their wheat-based counterparts.
Flavor: The natural sweetness and earthy flavor of pumpkin puree infuse the scones with a rich, seasonal taste. It complements the cinnamon, and nutmeg, creating a warm fall flavor.
Nutritional Benefits: Pumpkin puree is packed with nutrients, including vitamins A, C, and E, as well as fiber, making scones a wholesome snack or breakfast option.
The Benefits of Millet Flour
In today’s recipe, I used millet flour. Millet is an ancient grain that, when ground, has a grain-like consistency. The millet flour contributes a wonderful texture to gluten-free baked goods.
Millet is also a powerhouse of nutrients, packed with protein and minerals such as manganese, phosphorus, magnesium, iron, and zinc.
Using millet flour in these gluten-free pumpkin scones gives them a slightly nutty flavor and makes them more nutritious.
Making Scones in a Pie Dish
I love making scone recipes because they are easy to make. In this recipe, I used a pie dish to bake the gluten-free scones. Instead of forming a circle and cutting the dough into wedges, I baked them in a pie dish—less mess, super easy, and perfectly shaped.
The Nutmeg Glaze
For the glaze, I wanted to use a spice that complements pumpkin, so I created a buttery nutmeg glaze. The warm flavor of nutmeg adds an extra layer of sweetness transforming the scones to an indulgent treat.
The Key to Perfect Gluten-Free Pumpkin Scones
Creating the perfect gluten-free pumpkin scones involves a few essential tips to ensure they turn out tender, flavorful, and delicious. Here’s what you need to know:
Use Cold Butter
Using cold, unsalted butter is crucial for achieving that tender, flaky texture. Grate cold butter on a box grater and toss it with the dry ingredients. This technique creates steam pockets during baking, leading to tender scones.
Measure Flour Correctly
For the most accuracy, a kitchen scale is best. Or, use a spoon to gently scoop the flour into the measuring cup. Avoid scooping directly from the bag or container, as this can compact the flour. Once the cup is filled, use a knife to scrape across the top of the measuring cup, leveling it off without packing it down.
Incorporate Buttermilk
Adding buttermilk brings several benefits:
Moisture: It adds moisture without making the dough too wet, helping to achieve the right consistency.
Flavor: The tanginess of buttermilk enhances the overall flavor of the scones.
Tenderness: The acidity in buttermilk helps tenderize the gluten-free flour, resulting in a softer texture.
Brush the Tops with Buttermilk: It adds a golden color to the tops and an extra layer of moister.
Don’t overmix the Dough
Mixing the ingredients until just combined is key. Overmixing can lead to tough heavy scones, so gently fold the ingredients together for a light, flaky texture.
Chill the Dough
Chilling the dough helps solidify the fat ( butter) in the mixture. This results in a flakier texture as the butter creates steam during baking, leading to light and tender scones. It also makes handling the dough easier.
Serving
Gluten-free scones are best when enjoyed right out of the oven—warm and buttery. If you have any leftovers the next day, warm them up briefly in the oven or microwave for a few seconds. Enjoy!
Not all scones are created equal, more gluten-free scone recipes to explore
Recipe Review: 
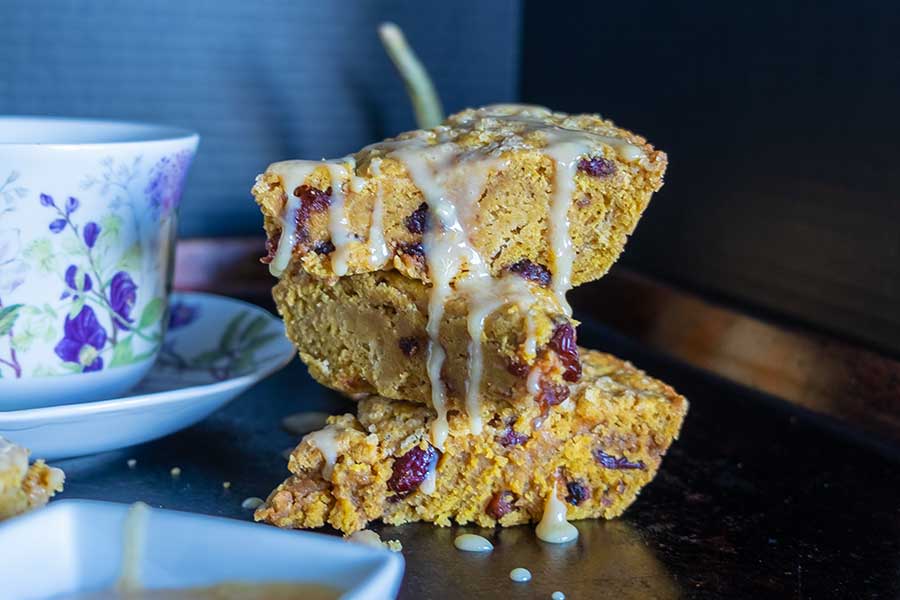
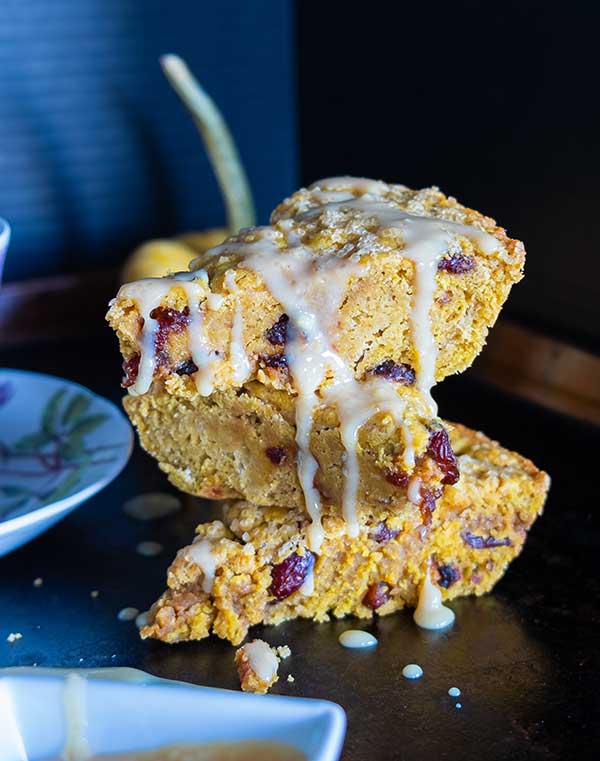
Gluten-Free Pumpkin Cranberry Scones With Nutmeg Glaze
These gluten-free pumpkin cranberry scones are a sweet treat that perfectly captures the essence of fall. The combination of moist pumpkin and tart cranberries creates a balance of tasty flavors, while the nutmeg glaze adds a touch of sweetness and warmth.
The texture is light and moist, making them perfect for breakfast or an afternoon snack. Whether enjoyed fresh out of the oven or warmed up later, these scones are a perfect autumn treat.
Preheat the oven to 375º F. Lightly butter a pie dish
2.
Whisk together the dry ingredients (from flour to cranberries). Add the butter and toss to combine.
3.
In a separate bowl, whisk together the pumpkin, buttermilk, egg, and vanilla. Add this mixture to the dry ingredients and mix until the dough starts to stick together, being careful not to overmix. If the dough seems too dry, add 1 to 2 tablespoons of buttermilk.
4.
Transfer the dough to the prepared pie dish. Using a spatula, gently press the dough into the dish and smooth out the top. Dip a sharp knife in oil and slice the dough into six wedges.
5.
Brush the top with buttermilk and sprinkle with 1 tablespoon of coconut sugar — Bake for 25 - 30 minutes, until the scones are golden brown and firm to touch.
6.
While the scones are baking, prepare the nutmeg glaze. In a saucepan, melt the butter over medium heat until it starts to foam. Remove from heat and whisk in powdered sugar, maple syrup, vanilla, and nutmeg until smooth.
7.
When the scones are finished baking, let them cool in the pie dish for 15 minutes. Then, use a knife to separate the scones and generously drizzle them with nutmeg glaze. They are best served warm!
Nutrition Info
Nutritional Value per Scone 1/6 | Calories: 200 | Total Fat: 9g | Sodium: 150mg | Total Carbohydrates: 28g | Dietary Fiber: 2g | Sugars: 8g | Protein: 3g | Note: This calculation is approximate and can vary based on specific brands and variations in ingredient quantities.
Leave a Comment
Kristina
thank you, they sound delicious!
Terri Willoughby
These scones were amazing! So easy due to putting the dough in the pie pan. I made a few tweaks, like using fresh cranberries, used monkfruit to make them sugar free, & King Arthur G-F flour to replace the 3 flours (sorghum, millet and rice). King Arthur Measure for Measure flour already includes the xanthan gum. I froze Myokos dairy free butter for 30 minutes and grated it. Perfect! Used hemp milk and added 1/4 tbsp. apple cider vinegar to make the buttermilk. For the glaze I used Lakanto Powdered sugar and Lakanto Maple Syrup. All the changes I made were so these would be G-F, D-F and sugar-free. Oh my goodness...that glaze! So yummy!
Leave a Reply
You must be logged in to post a comment.