This post may contain affiliate links, please see our privacy
policy for details
Okay, picture this: you’re sitting in your cozy kitchen, the smell of freshly baked pastries wafting through the air, and you just made these delicious, melt-in-your-mouth gluten-free cheese danishes. Sounds like a dream, right? Trust me, it’s not—this gluten-free cheese danish recipe is SO easy, you’ll be shocked! No complicated dough rolling, no over-the-top ingredients, just straight-up deliciousness. Seriously, I promise you’ll love it.
Why This Gluten-Free Cheese Danish Recipe Had to Be Easy
When I set out to create this gluten-free cheese danish recipe, I knew one thing for sure—it had to be easy. I mean, who wants to spend hours in the kitchen on a weekend morning (unless you’re baking gluten-free bread from scratch, and in that case, you’re a superhero). So, I made sure this recipe was simple enough for anyone to try. You don’t even need to roll out dough or worry about getting it just right. You’ll feel like a pastry pro in just 20 minutes of hands-on time.
How I Made This Easy Gluten-Free Pastry Work
(Without Losing My Sanity)
So, here’s the deal. Traditionally, to get that buttery pastry you love in a cheese danish, you have to deal with a bunch of butter folding, rolling, and basically making a big mess. But I’m all about cutting out the unnecessary work. I kept the dough slightly wetter (trust me, this is a good thing) and used a spatula to fold the butter into it. No fancy rolling pin needed!
Simple, No-Fuss Method: Scooping Dough for Effortless Danish Pastries
I skipped the whole square-folding thing you usually see in danish recipes and just scooped the dough with a cookie scoop—like you’re making cookies! Then I used my fingers to create little wells in the middle of each scoop, which I filled with a creamy cheese filling and a spoonful of jam. Voila! That’s it! No fussy techniques, no perfection needed. Just pure, warm, buttery gluten-free Danish.
Flaky, Buttery, & Oh-So-Delicious: The Secret to Gluten-Free Pastry Magic
You know how the best pastries are always flaky? Yeah, well, it’s all about keeping that butter cold. I pop the butter in the freezer while the dough rises—trust me, it makes all the difference. Then I fold in small chunks of cold butter, which creates those magical pockets of air that make each bite of your cheese danish just melt in your mouth. You’ll get the texture of a buttery croissant, but with a gluten-free twist!
What’s in a Name? Why Are They Called Danish Pastries?
I’ll be honest, I used to think a “danish” was just a type of pastry you get at the bakery, like “Hey, I’ll take a cheese danish!” But it turns out, these flaky beauties actually have a cool history. Danish pastries originate from—you guessed it—Denmark.
They’re similar to croissants (because who doesn’t love croissants?), except they’re made with yeast, giving them a slightly airy structure that you just can’t resist. So, it’s really the butter and the yeast that make them flaky and fluffy. Basically, they’re magic in pastry form.
Customizing Your Gluten-Free Cheese Danish Fillings
Once you’ve nailed the basic dough, the fun part comes—the fillings. You can easily customize these gluten-free cheese danishes. While I’m a huge fan of the classic cheese filling (because cheese, duh), you could go all out with flaked almonds, apricot jam, or fresh berries. Heck, I’ve even turned these into savory danishes with a gluten-free samosa filling, and let me tell you, it’s outstanding.
If you want to try something a little more out there, you could also go for apple slices, caramelized onions, or even chocolate. Really, the world is your gluten-free danish oyster!
And, if you love this gluten-free cheese danish, you’ll definitely want to try my gluten-free apricot danish coffee cake next—it’s another easy, delicious dessert that’s perfect for any occasion!
In a large bowl whisk flour, arrowroot starch, sugar, yeast and baking powder
2.
Melt 4 tablespoons of butter and place the remaining butter in the freezer
3.
Add eggs, milk, melted butter and lemon juice to dry ingredients and mix. The dough should be fairly wet. Cover the bowl with plastic wrap and set aside for 1 hour allowing the dough to rise.
4.
Once the dough has risen, cut the frozen butter into small cubes and fold into the dough
5.
Preheat the oven to 350 F and line a large baking tray with parchment paper
6.
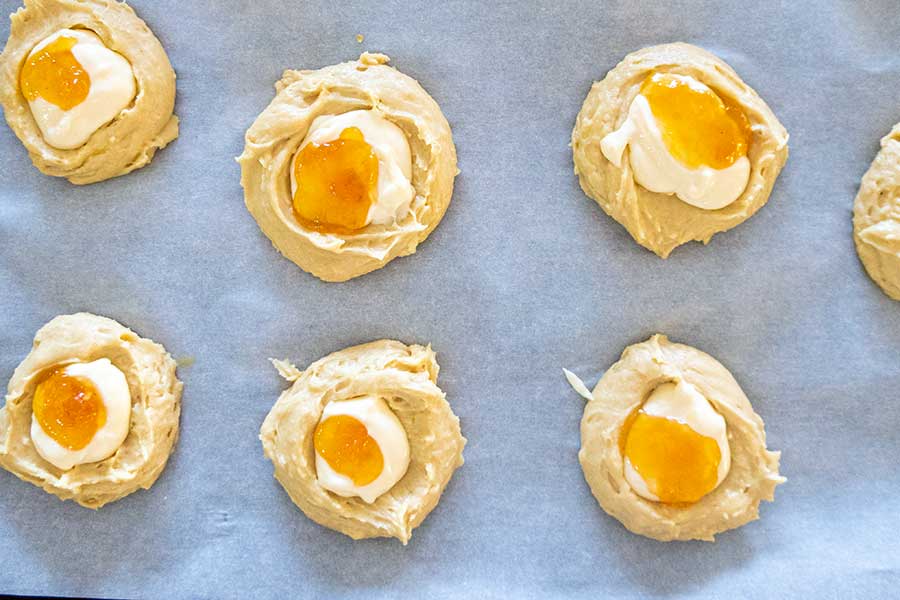
Using a large cookie scoop, scoop out 10 mounds of dough and place on the baking tray 2 inches apart. Dip your fingers in some oil and create a well in each mound of dough
7.
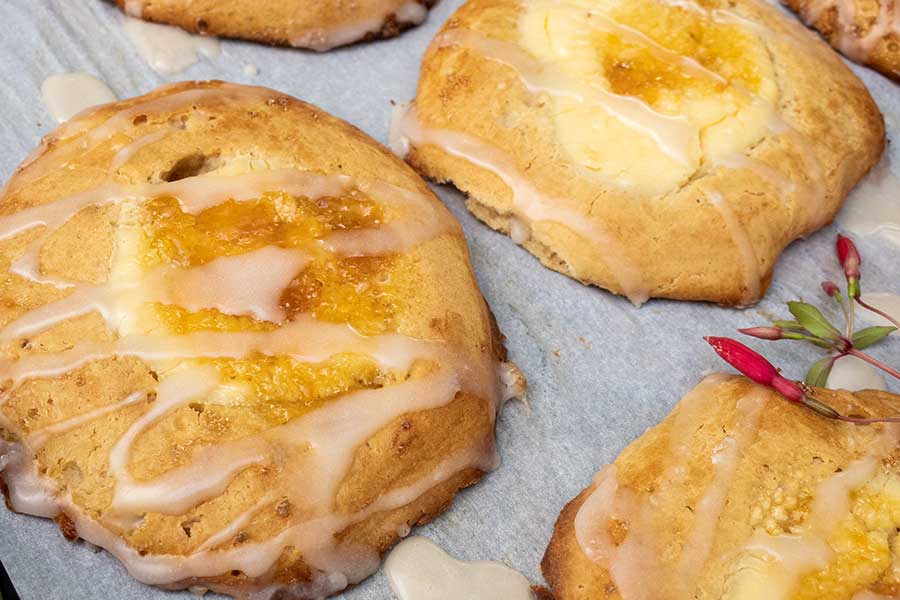
For the filling, cream together cheese, egg yolk and sugar. Add one spoon of cheese mixture to each well and top with one spoon of jam. Whisk the remaining egg white and brush over the exposed dough. Bake for 18 - 20 minutes until golden
8.
For the icing, whisk the lemon juice with the powdered sugar and drizzle over the pastries
Leave a Comment
Kristina
Thank you Juliah
Juliah. H
omg I can’t believe how easy this danish recipe is and the texture is so good! Thank you, keep up the excellent work
Kristina
yes absolutely, you can use dairy-free milk and dairy-free cheese or use just jam.
kiki
can I make the danishes without dairy?
Kristina
Thank you for letting me know Sonja! I always love feedback
Sonja
Just made these danishes, I am very happy with how they turned out, I have tried other gluten free cheese danishes and they did not make the cut. Thank you thank you!!!
Kristina
about 1/4 - 1/2 inch
Melissa
How small do you cut the cubes of frozen butter?
Kristina
yes, please let me know how they turn out. Kristina
Kathy
omg I love pastries, this recipe looks super easy! I will try to make it and let you know how it turns out. Thank you Kathy
Leave a Reply
You must be logged in to post a comment.